
Sometimes called Rally Obedience or Rally-O, it’s more just having fun with your dog. Rally has exploded in popularity the last few years, and here’s why:
You and your dog are in constant motion.
You can talk to your dog the whole time you’re on course.
You’re building the bond with your dog when you practice.
You can get ribbons.
Rally – more fun with your dog.
What is Rally?
Rally is a series of signs (the Rally course) that you follow with your dog. These signs will tell you to do something, such as “Left Turn.” In AKC Rally, you have to perform the behavior directed on the sign in a certain way, and the Rally Regulations provide descriptions of how to perform the behaviors. At a Rally Trial, a judge sets out the course, and there are levels of difficulty. Everyone starts at the Novice level. We’ll get into the upper levels later.
All the things you’ve learned about training your dog in the 2-Minute Tips are used in your Rally training too. Here’s an opportunity to show off your great dog!
Every week (or so) Fran will take you through an aspect of Rally training that will help you succeed. She’s taught Rally in-person at our local club for years and has competed through the Master (highest) level. Fran will give you the tips and tricks to help you and your dog get the highest scores and the lowest times. And if Rally intrigues you and you want to go further, be sure to download the Rally Success Foundation Guide we put together for you.
1. Rally is mostly heeling
Rally is mostly heeling – and if you’ve gotten our Loose Leash Walking Guide or Book 3: Let’s Go for a Walk, then you’re got this covered! As described above, you’ll do other behaviors between heeling passes.
In this first video, Fran (with Simon) gives you a couple of secrets to successfully training “heeling.” Like – how to hold your treats – and don’t be stingy. And where your dog should be. Where and when to reward your dog. What foot to start with. So – watch this short video and go have fun with your dog!
2. The automatic sit
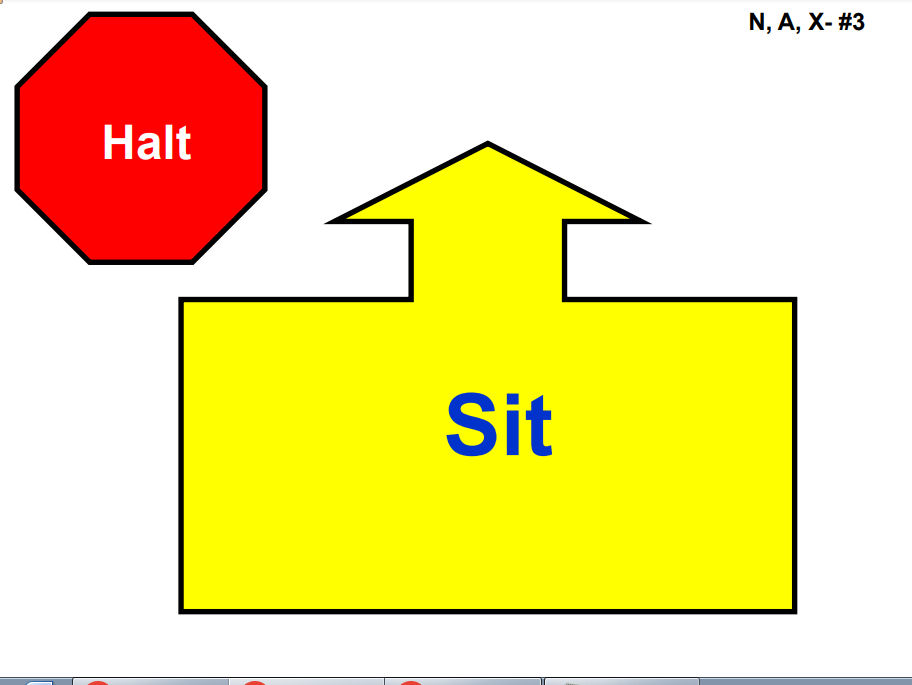
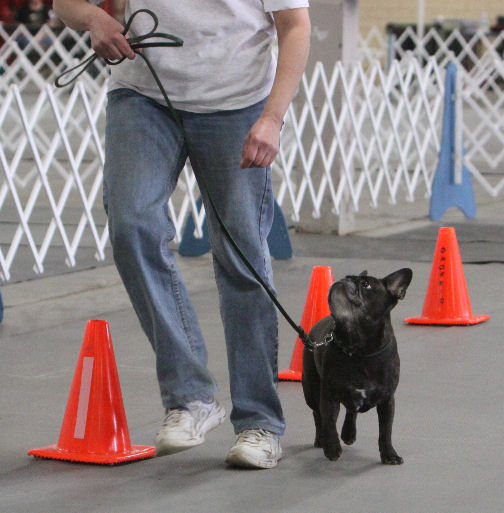
Almost as important as heeling in Rally is the automatic sit. Sign #3 (immediately after “Start” and “Finish”) in AKC Rally is, in fact, “HALT – Sit.”
Whenever you see that big red octagon, you stop and your dog sits in “heel” position at your left side. Pause for a moment – long enough for the judge to see that your dog’s butt is planted on the floor. Then you can continue to the next station.
Practice this by heeling with your dog and stop. If your dog already knows the “Sit” command – use it as you stop and reward by placing a treat directly in your dog’s mouth. Pretty soon you won’t need to use the command. Do reward the automatic sit periodically, though – you don’t want to lose this behavior!
If your dog doesn’t already know the command, now’s a great time to teach it. You may have success in luring your dog’s head up with a treat. When his butt hits the ground, reward and say, “Good sit! That’s sit!” He’ll learn it in no time.
In this short video, Fran demonstrates a slightly more complex sign – with 3 sits: 2 have the red octagon and 1 is implied!
#3 – “Call Front”

You’ll see a “Call Front” on practically every Rally course. So – throw a few in as you practice your heeling. “Front” position requires that your dog is sitting directly in front of you, facing you. He should be straight and, optimally, looking at you but that’s not required.
When you see a “Call Front” sign in the Novice class you may take one or two steps backward to get your dog into the proper position more easily. No more than two steps, though, or there may be points deducted from your score. When you practice this, you can take more steps to get that straight position – have a treat in each hand. If your dog is heading to your right, treat on to the right with your right hand. Same thing if your dog is heading to your left – treat with the left hand.
The Novice “Call Front” signs also include a “Finish” – the dog returns to “Heel” position. Don’t worry about that for now. Focus on the “Front” and when we do get to the “Finish,” practice Fronts and Finishes separately.
Here’s a short video with Fran and Simon.
#4 – “Finish Right”
Last time we talked about “Front” in Rally. Most Fronts are followed by “Finish” – when your dog comes back to “Heel” position. There’s a “Finish Right” and a “Finish Left.”
The “Finish Right” requires that you, the handler, keep your feet in place and your dog walks to your right, behind you, and back to Heel. In Novice, your dog is on lead, so during the Finish Right, you’ll switch hands, passing the leash behind your back. Train this by moving your right foot back while cuing your dog – don’t take a step back, and you’ll be phasing this movement out as your dog becomes more familiar with the move. When your dog gets back to Heel, follow the sign – some signs require a “Sit” in Heel position. Fran and Simon demonstrate the “Finish Right.” And Simon demonstrates how to be very silly.
#5 – “Finish Left”
Obviously, the other way for your dog to get to “Heel” position from “Front” is the “Finish Left.” This is what obedience people call the “Swing” finish – because your dog just swings into place on your left. Train this with a lure. (I know – we don’t usually like to lure our dogs, but in this case our dogs seem to understand what’s expected even after we fade the lure.) Move your left foot slightly back as you lure your dog back and then around into place and bring your foot back, even with your right. This is another cue for your dog. Just use it the first few times you practice this.
#6 – Turns
There are lots of turns on any Rally course. There have to be in order to have 15 or more signs with enough room between signs, you and your dog have to turn. There are 90, 180, 270, 360 degree turns. And free form turns (Loops! – #s 37 and 38). For every Left turn sign, there’s a Right turn sign. For all of these turns, though, the official description indicates that the turn should be “tight.”
What’s a “tight turn?” Your turn should cover as small a space as you can, while your dog stays in “Heel” position. That’s easy with a left turn – you’re turning into your dog. But for a right turn, you’re turning away from your dog and it’s easier for him to get distracted by other things going on. Or a fuzzy on the floor. So, talk to your dog through those right turns – keep him close.
It also helps if your dog is aware of where his hind end is while he’s turning. He’ll be able to turn in a smaller circle if his back end can move independently from his front. So, practice that perchwork! (See “Does your dog know where his butt is?“)
#7 – “HALT – Walk Around”
There’s a version of #30 – “HALT – Walk Around” on most AKC Rally courses. And it’s the one sign that our dogs have the most trouble with. We’re heeling, we come to this sign. We stop, our dog sits. We start walking around, and that’s when the trouble starts. As our students start walking around their dogs, the dog swivels around to look at their people. It’s natural – we usually like it when our dogs look at us. But not for this sign. The dog should stay facing forward.
So, how do you train this so the dog doesn’t look around? Have 4-5 treats in one hand (probably the right). As you walk around, reward your dog to the front with your left hand. Your dog stays facing forward as you walk around, giving treats from whatever awkward position you can. Don’t worry – your dog will get this quickly if you make it clear that he’ll get many rewards if he stays facing the front. Fran, with Simon, demonstrate this in the video.
#8 – “Left About Turn”
AKC Rally sign number 29 – “Left About Turn” confuses all of my students when they first see it. It looks like a jumble of arrows going every which way. But, after a few times practicing this one without their dog, all of those green handlers are much smoother in their footwork and leash passing skills.
You’re heeling with your dog and see #29 in front of you. You turn left, toward your dog, and your dog goes (right) around you. You pass the leash from one hand to the other behind your back and you both end up in perfect “Heel” position to continue to the next sign! Clear? Well, Fran and Simon demonstrate in this video:
#9 – “Offset Serpentine”
AKC’s Offset Serpentine signs (numbers 41 and 42) confuse Fran’s students without fail. The Offset Serpentine is 3 pylons configured in a zig-zag manner. Which way to go? Where to start? Here’s the trick: the sign will tell you where to start and after that you just have to snake (serpent …ine) your way through the pylons.
So, “Offset Serpentine Right” means that the first pylon is on your right as you walk through the course. Similarly, “Offset Serpentine Left” means the first pylon is on your left.
Easy! In the video, Fran and Simon demonstrate the Offset Serpentine Right.
#10 – Serpentine (Straight Weave)
AKC Rally sign numbers 23 and 24 are for the regular Serpentine behaviors (weave twice and weave once). The straight weaves have 4 pylons, and the Offset Serpentines (numbers 41 and 42) have 3.
For the straight weaves, you and your dog will always enter the sequence with the first pylon that has the sign on your left. If it’s weave twice, you’ll weave through the pylons, circle the last one and weave back toward your starting point. For the straight weave once, after you finish weaving through the pylons, you’ll proceed to the next station.
Keep up your brisk heeling throughout the sequence. In the video, Fran and Simon demonstrate #23 – “Straight Figure 8 Weave Twice,” or the Serpentine down and back.
#11 – Figure 8
There are actually two Figure 8 signs in AKC Rally: #32, which can be used for all classes; and #108 for Intermediate and up. The more advanced Figure 8 involves nasty distractions – either treats placed in bowls covered with a screen placed diagonally from the Figure 8 pylons, or toys. This is a test of training your dog to ignore distractions!
But the performance of the Figure 8 is the same: you and your dog go around the pylons, completing a Figure 8 pattern. So, you’ll go through the center 3 times. Count out loud. Don’t lose track, and make sure the judge knows that you’ve completed the behavior. We like to say, “Don’t make the judge think!” Make it obvious that you know what you’re doing. You’ll notice on the video that Fran counts as she goes through the center.
Enter the Figure 8 wherever it makes the most sense, depending on the previous and the next station. Walk the Rally course with this in mind. Where do you want to be to get to the next station in the most efficient way?
In the video, Fran and Simon are doing the Figure 8 without distractions.
#12 – Spirals
Want to see Fran wobble? Ask her to do more than one Spiral!!! Ha! There are 2 Spiral behaviors in AKC Rally – #21 with the dog on the outside and #22 with the dog on the inside (between you and the pylons). The main focus of this behavior is for your dog to walk with you in heel position around all 3 pylons, then around the first 2, and then around the first one, then exit. I (Fran) don’t like to practice Spirals too much because I get dizzy! As long as you remember the sequence you’ll do fine! In this video, Simon and I are doing #21, “Spiral Right – Dog Outside.”
#13 – “Stop and Down”
AKC Rally Sign number 27 – “Stop and Down” confuses most of my students. The reason? There is no “Sit” in this behavior. Picture this: you and your dog are heeling along and then you encounter this sign. You, the handler stops. Tell your dog, “Down!” And he lies down from the standing – heeling position. There is no intermediate “Sit” position. A judge can deduct points if your dog sits! After your dog lies down, you pause for a second and then continue to the next station. That’s it!
We always recommend that you train every position from every other position as soon as your dog understands the positional concepts. That makes this sign as well as the “Walk Around” behaviors so much easier!
#14 – “Call Front – Return to Heel”
AKC Rally sign #35 confuses every handler – until they learn the secret! I always tell my students that the sign should read: “Call Front – Handler Return to Heel.” That makes it crystal clear! If you and your dog know #30 – “HALT – Walk Around,” then you’ve got this one!
Just call your dog to front as you approach the sign (and you can take a step or two backward to get the perfect “Front” position). Tell your dog to “Stay,” or “Wait,” or whatever your word is, and then you walk back to “Heel” position. Pause a moment and continue. This is a 180 degree turn, and you’re going back the way you started. Easy.